This chapter contains the following topics:
This chapter describes Inventory Status, how to set it up, and how to print lists of the status information for items.
This selection allows direct access to and entry of status information for items that are already entered. The Status screen is essentially the same as in the Items selection.
This selection is provided separately to allow you to easily enter status information when item information already exists. For example, when you start stocking an existing item at a new warehouse, you only need enter status information for the new warehouse.
Status information can be deleted in the Status selection (this chapter) if the status record contains no current quantities (on-hand, committed, on-order, backorder, on work order).
In addition, status information can be deleted in the Items selection when an item record is deleted, if all status records for the item contain no current quantities.
An item record cannot be deleted in Items if one of its status records contains current quantities.
Select
Status from the I/C menu.
A screen similar to the following displays:
If there are existing status records, up to 6 will display in the list box at the top of the screen.
|
New |
For adding a new status |
|
Edit |
For editing an existing status |
|
Save |
For saving a new status or changes to an existing status |
|
Save/New |
This button combines the Save and New buttons by first saving the status and then starting a new status |
|
Cancel |
To cancel the editing or adding of a status |
|
Exit |
To exit the screen. Exit works like cancel when you are adding or editing a status |
When you select the add button to enter a new status, you must enter the Warehouse field.
Enter the warehouse code. If you are not using multiple warehouses, then you cannot enter this field.
When editing an existing status, this field cannot be changed.
|
Format |
Two characters |
|
Example |
Select the <Enter> key for the Central warehouse |
Character Mode
For multiple warehousing, you are asked to specify the warehouse for which you want to enter the item's status information.
Options
Enter the warehouse code, or use the option:
|
<Enter> |
For Central (if you defined a Central warehouse in Warehouses). |
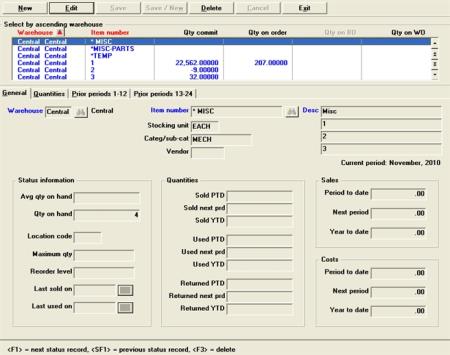
The following screen displays:
|
Note |
If you are using single-warehousing, you will not see the Warehouse field. |
From this screen, you can work with both new and existing status information for an item. If status information for the warehouse you specified above and for the item number you enter here already exists, that information appears and is available for changes or deletion.
Item number
Options
Enter the item number, or use the options:
|
<F1> |
For the next status |
|
<F1> |
For the previous status. |
|
Format |
Four characters |
|
Example |
Type 101 |
When the item is specified, the item description, category and sub-category, vendor number, stocking unit, and quantities are displayed.
Use the Delete button, Alt+d or <F3> to delete a status record.
A status record cannot be deleted if it has a non-zero quantity on hand, committed, on order, on back order, or on work order. In addition, you are asked OK to delete ? if you select to delete a status record with a non-zero PTD, YTD, or prior period amount.
There are also other checks made. If you cannot delete a status record, a message will display the reason for the error.
Avg qty on hand
This is a display only field. This quantity is calculated when you run Close a period, and represents a running weighted average of the quantity on hand each period. See Weighted AverageRegarding inventory, weighted average measures the total cost of items in inventory that are available for sale divided by the total number of units available for sale. Typically this average is computed at the end of an accounting period. Suppose you purchase five widgets at $10 apiece and five widgets at $20 apiece. You sell five units of product. The weighted average method is calculated as follows: Total Cost of Goods for Sale at Cost (divided) Total Number of Units Available for Sale = Weighted Average Cost per Widget Example: Five widgets at $10 each = $50 Five widgets at $20 each = $100 Total number of widgets = 10 Weighted Average = $150 / 10 = $15 $15 is the weighted average cost of the 10 widgets. Refer to the information in Maximum qty field regarding Avg qty on hand.
Qty on hand
Qty committed
Qty on back-order
Qty on order
Qty on work-order
No entry is allowed in these fields. Their meaning is the same as on the first Items screen, except that the quantities shown are for this warehouse.
Enter a bin or floor location code where items are stored.
When picking tickets are printed in Order Entry or when a Physical Count Worksheet is printed, items are listed in order by their location code to help physically locate them.
The location code is alphanumeric, so it may be letters, numerals, or a mixture of both. Alphanumeric characters are handled differently by the program than purely numeric numbers. For example, the alphanumeric characters “12^^” (where ^^ represents 2 spaces) is not the same as the number 12. Also, the value “9^^^” (with 3 spaces) is greater than the value “12^^” (with 2 spaces).
If you intend to use only numbers for location codes, and you wish them to appear in ascending order on the picking tickets, you must enter leading zeros in the Location code field. Enter the number 9 as “0009” and 12 as “0012”. In this way, items will always appear in the desired order on the picking tickets.
Enter the location code.
|
Format |
Up to four alphanumeric characters |
|
Example |
Type A1 |
Quantities for This Warehouse:
All quantities entered or displayed on this screen are for this warehouse only.
Enter the maximum quantity that you have decided should be on hand for this item.
|
Note |
A quantity called Average quantity on hand is calculated by the software and used in the Purchasing advice report. The software restricts this average quantity to be no more than the maximum quantity and no less than the reorder level (next field). |
If you use the Purchasing advice report, you should enter a value in this field and in Reorder level to ensure that useful information is shown on the report. See Purchasing Advice chapter.
|
Format |
99999999.99999 |
|
Example |
Type: 10000 |
Enter the quantity at which the item should be reordered, to be used for the Stock Status and Purchasing Advice Reports.
|
Format |
99999999.99999 |
|
Example |
Type 25 |
Enter the most recent date on which this item was sold. It is automatically updated when an inventory sale transaction is posted.
|
Format |
MMDDYY |
|
Example |
Press <Enter> |
If you are not using either kits or Job Cost, this field displays (Not applicable).
Enter the date of the last usage of this item in a work order or on a job (as opposed to a sale).
This field is updated when a job usage transaction (from Job Cost) or component usage transaction is posted using Inventory.
|
Format |
MMDDYY |
|
Example |
Press <Enter> |
Period to date, Year to date and Next period Fields
When a transaction (sale, credit memo, job usage, or assembly) is posted, the following Period to date and Year to date fields are updated if the transaction date is on or earlier than the period ending date. (The period ending date was entered in Control information.) If the transaction date is beyond the period ending date, then it is update in the Next period field.
For an existing status record, you would ordinarily not want to change these fields because they are automatically updated by other selections. If you try to change these fields, a message informs you that a change is not allowed.
However, if Allow protected changes ? is set to Y in Company information, you may override this restriction. Refer to the Overriding Protected Changes in the System User documentation for information on how to do this.
Character Mode
For a new item, you can press <F2> at field # 7 to set all remaining fields to zero. Otherwise, you can enter information in each field as described below:
Quantities
Sold YTD
Enter the quantity of the item sold to date in the current period and year.
The quantity in each field is increased when a sale is posted, and decreased when a credit memo is posted. Sold PTD and Sold YTD represent the actual quantity sold, less all returns.
|
Format |
999999999.99999- |
Used YTD
If you do not use either kits or Job Cost, field #’s 9 and 10 display (Not applicable).
Enter the quantity used to date in the current period and year for either a work order or on a job (as opposed to a sale).
The quantity in each field is updated when a job usage transaction (from Job Cost) or a component usage transaction is posted.
Returned YTD
Enter the quantity of the item returned to date in the current period and year.
The quantity in each field is increased when a credit memo for returned goods is posted.
|
Format |
999999999.99999- |
Sales
Year to date
Enter the dollar amount sold period-to-date and year-to-date.
The dollar amount in each field is increased when a sale is posted, and decreased when a credit memo is posted. Sales Period to date and Year to date represent actual sales, less all returns.
|
Format |
999,999,999.99- |
Costs
Year to date
Enter the dollar amount of costs period-to-date and year-to-date.
The dollar amount in each field is increased when a sale is posted, and decreased when a credit memo is posted. Costs Period to date and Year to date represent the actual cost of goods sold, less all returns.
|
Format |
999,999,999.99- |
Make any needed changes.
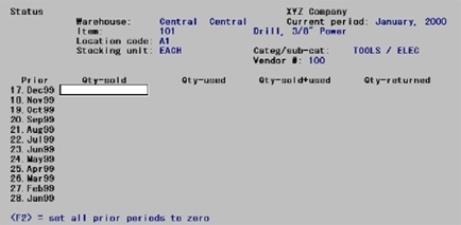
The screen appears as shown above if you are using kits and/or Job Cost. If you are not using kits or Job Cost, the Qty-used and Qty-sold+used columns do not display.
Quantity sold
Quantity used
Qty sold + used
Qty returned
Enter a quantity in each field, except Qty-sold+used (which is calculated automatically) or press <F2> to set the quantities in all prior periods to zero.
|
Format |
999999999.99999- |
The first status screen reappears to enter another item in this warehouse.
When there are no more items associated with this warehouse, press <Esc> at the Warehouse field.
Each time you run the Close a period selection, the oldest period is removed and the period just closed becomes the newest period displayed on this screen.
You can print a status list by item number or by item description.
Select
Status by item # or Status by item description from the Reports menu.
Graphical Mode
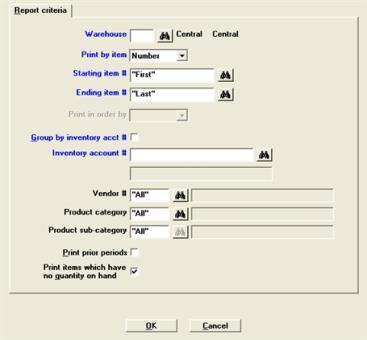
The Status by item # screen looks like this:
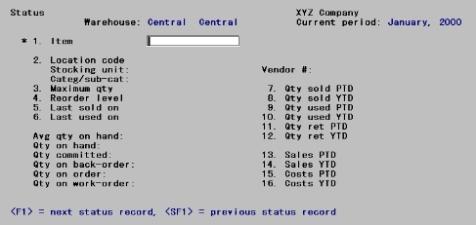
Character Mode
A screen then displays similar to this:

If you are not using multiple warehouses, then the Warehouse field and Print in order by warehouse or Item ? field will not display. The field numbers will change and so that there are 9 fields instead or 11.
With the exception of the second and third fields, the screen for both status lists are almost identical.
|
Format |
two characters |
Options
For multi-warehousing, enter the warehouse code or use one of the options:
|
<Enter> |
For the Central warehouse |
|
<F5> |
For "All" warehouses |
|
Note |
If you are not using multi-warehousing, you will not see this field or the Print in order by warehouse or item ? field, and all field numbers will be one less than the numbers shown. |
Select to print by either item number or description.
|
Format |
Drop down list with the choices of Number or Description. |
Enter the starting item # to be shown on the report or press <F2> for the first item #.
Ending item #
For the Status by Item Number List, enter the ending item # to include.
Options
You may use one of the options:
|
<F2> |
For the highest item # |
|
<Enter> |
To select only the item # entered in the starting item # field. |
For the Status by Item Description List, enter as follows:
Enter the starting item description that is alpha-numerically lowest in the range of items to be shown on the report or press <F2> for the first description.
Ending item description
Enter the ending item description that is alpha-numerically highest in the range of items to be shown.
Options
You may use one of the options:
|
<F2> |
For the "Last" description |
|
<Enter> |
To show only the starting item description (if you did not select "First" for starting description above) |
If you selected a specific warehouse for the first field or you are not using multiple warehouses, this field is skipped.
If you selected "All" warehouses, enter Warehouse to print the status records grouped by warehouse, or enter Item to print the status records grouped by item.
|
Format |
One character |
The following field is requested only for the Status by Item Number List:
If you selected to print by warehouse, this field is skipped.
Check this box to print the items in order by inventory account number.
Leave the box unchecked to print the items in item number order. If you do not check this box, entry of the next field is not allowed.
Enter the inventory account for the items to be printed.
Options
You may use one of the options:
|
<F1> |
For the next inventory account |
|
<SF1> |
For the previous inventory accounts |
|
< F2> |
For the default inventory account in I/C Control information |
|
<F5> |
For "All" inventory accounts. Items will print in item number order within inventory account. |
Enter a vendor number for the items to be printed or press <F5> for "All" vendors.
|
Format |
Six characters |
This is the Category you assigned to each item in Items.
Enter a product category to include only items of this category or press <F5> for "All" product categories.
|
Format |
Five characters |
This is the Sub-category you assigned to each item in Items. Enter a product sub-category to include only items of this sub-category or press <F5> for "All" product categories.
|
Format |
Five characters |
Check this box to print all quantities sold, returned, or used in prior periods. (The report prints faster and requires less paper if your answer leave the box unchecked.)
Print items which have no quantity on hand
Check this box to include items which have no quantity on hand.
Select OK to print the report or Cancel to return to the menu without printing.